Your First Project
Your First Project
Learn how to create and organize your StoryFlow Editor projects. This guide covers project structure and common patterns.
Creating a New Project
When you create a new project in StoryFlow Editor, the application sets up a complete folder structure on your computer. Understanding this structure will help you organize your interactive stories effectively, especially as they grow in complexity.
To create a new project:
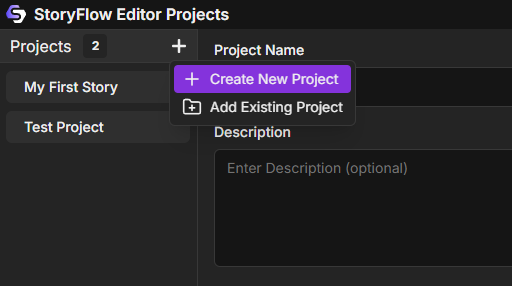
- Open StoryFlow Editor and you'll see the Projects Window
- Click "Create New Project" in the toolbar
- Enter a descriptive project name (letters, numbers, spaces, hyphens, and underscores only)
- Choose a save location on your computer (e.g., Documents/StoryFlow Projects/)
- Optional: Add a description to help you remember what the project is about
- Optional: Check "Initialize Git Repository" for version control
- Click "Create"
StoryFlow Editor will create a new folder at your chosen location with the project name. Inside, it generates the necessary files and folders to get you started immediately.
Understanding Project Structure
Each StoryFlow project follows a simple, organized folder structure. All your story content lives inside the project directory, making it easy to backup, share, or move your projects between computers.
Here's what a typical StoryFlow project looks like on disk:
CodeCopy
MyAdventureGame/
├── MyAdventureGame.storyflow    # Project metadata file
├── global-variables.json        # Global variables (created when needed)
├── Content/                     # All content lives here
│   ├── Scripts/
│   │   ├── Main_Menu.sfe       # Default startup script
│   │   ├── Chapter_1.sfe       # Your story scripts
│   │   └── Dialogue.sfe
│   └── Images/                 # Optional: organize assets
│       ├── backgrounds/
│       └── characters/
└── .gitignore                  # If Git was initialized
Key Files Explained
- *.storyflow file: Contains project settings, name, description, and which script runs first
- global-variables.json: Stores variables shared across all scripts (created automatically when you add global variables)
- *.sfe files: StoryFlow Editor script files containing your nodes, connections, and local variables
- Content folder: The root folder for all your scripts and assets
Adding Scripts
Scripts are the building blocks of your interactive story. Each script file (.sfe) contains a standalone flowchart of nodes that represents a scene, chapter, or dialogue sequence. You can have as many script files as you need to organize your story.
To create a new script:
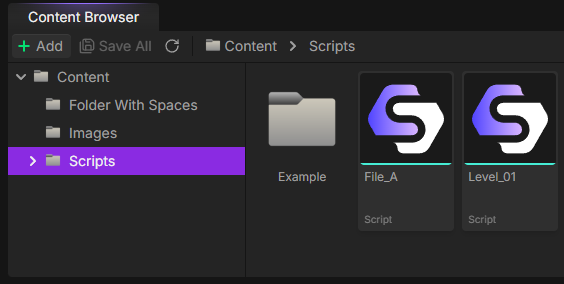
- In the Content Browser at the bottom of the editor, navigate to the folder where you want to create the script
- Either:
- Click the Add button (green plus icon) in the toolbar and select Script
- Or right-click on empty space in the folder view and select Script
- A new script file will appear - type a descriptive name (e.g., "Chapter_1", "Merchant_Dialogue", "Intro")
- Press Enter to confirm
Each new script starts with a single Start node. This is the entry point where the script begins when it's loaded. You can then add dialogue nodes, logic nodes, and other node types to build your story flow.
Tip: Organizing Scripts
You're free to organize your project however you want. Here's one example of creating subfolders within Content/:
- Content/Scripts/ - Main story scripts
- Content/Dialogue/ - Reusable dialogue sequences
- Content/Chapters/ - Individual chapters or acts
- Content/Menus/ - Menu and UI flows
Setting your startup script:
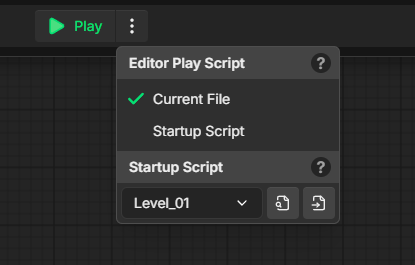
The startup script is the first script that runs when someone plays your story. By default, this is set to Content/Scripts/Main_Menu.sfe, but you can change it:
- Click the menu button () next to the Play button in the top toolbar
- Under "Startup Script" in the dropdown menu, select your desired script from the list
- The script is automatically saved as your project's startup script
Organizing Assets
While StoryFlow Editor is primarily focused on narrative flow and logic, you may want to include images or other assets in your project. The Content folder is flexible - you can create any folder structure that makes sense for your project.
Example asset organization:
CodeCopy
Content/
├── Scripts/              # Your story scripts
├── Images/              # Image assets
│   ├── Backgrounds/
│   ├── Characters/
│   └── UI/
└── Data/                # Additional data files
Note: Asset Handling
StoryFlow Editor currently focuses on story flow and logic. While you can store asset files in the Content folder for organization, the editor doesn't directly embed or manage images within the story. You can reference file paths in your dialogue text for use in game engines during JSON export.
Reserved filenames:
The following filenames are reserved and cannot be used for your scripts:
global-variables(any extension) - Reserved for the global variables systemproject(any extension) - Reserved for the project configuration system
Avoid using these names for your script files to prevent conflicts with StoryFlow Editor's internal systems.
Ready to Build!
Now that you understand project structure, dive into the Visual Scripting Overview to learn how to build your interactive stories using the visual scripting system.
Related Topics
→ Quick Start→ Content Browser→ Visual Scripting→ Best Practices