Play in Editor
Play in Editor
The Play feature lets you instantly test your interactive stories without exporting. Run your current script or the entire project directly from the editor.
Overview
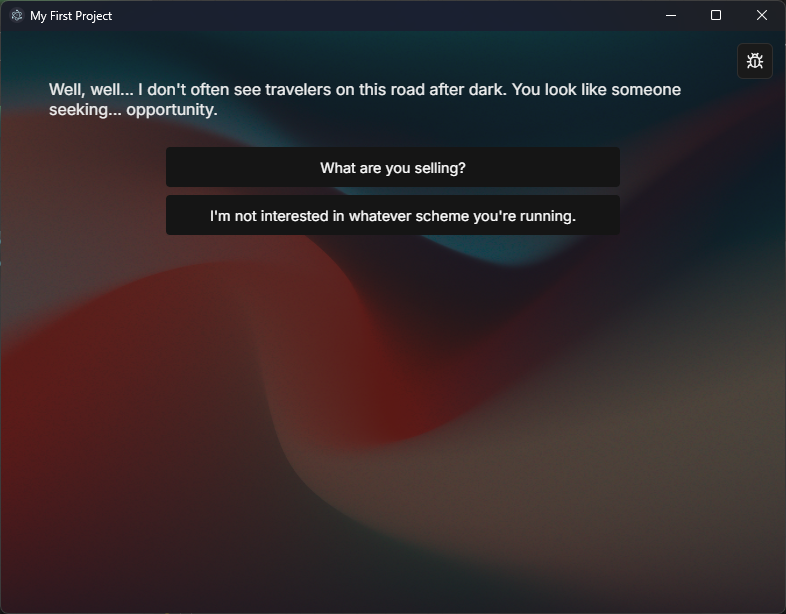
The Play in Editor feature is StoryFlow's built-in testing environment. It opens a separate Play Window where you can experience your story as players will see it, complete with dialogue, options, background images, and variable tracking.
Key Features:
- Instant Testing: Test your story with a single click - no build or export step required
- Two Play Modes: Test the current script you're editing or run your entire project from the startup script
- Automatic Saving: All unsaved changes are automatically saved before playback begins
- Runtime Debugger: Built-in debugger for monitoring variables and execution flow
- Fast Iteration: Make changes, press Play, and see results immediately
Development Tool
The Play Window is designed for testing during development. For sharing your finished story with players, use the HTML Export feature to create a standalone game.
Starting Playback
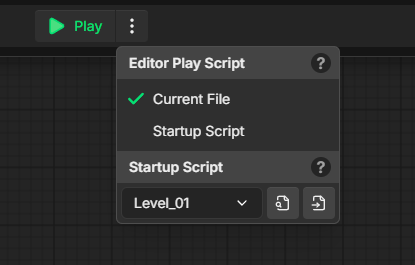
The Play button is located in the center of the editor's top toolbar. It's a dual-button control with a green Play icon and an adjacent settings menu.
Basic Playback
- Open a script: Make sure you have a script file (.sfe) open in the editor
- Click Play (▶): Click the green Play button in the toolbar
- Play Window opens: A new window appears showing your story's first dialogue
- Interact: Click dialogue options to progress through your story
Quick Testing Workflow
When developing a scene, keep the Play button handy. Make changes to your nodes, press Play to test, close the window (or press Escape), adjust your nodes, and repeat. This rapid iteration cycle helps you polish your story quickly.
Play Modes
StoryFlow offers two distinct play modes to support different testing workflows. You can switch between them using the dropdown menu next to the Play button.
Current File Mode
Tests the script file you're currently editing. This is the default mode and is ideal for testing individual scenes or scripts.
When to use Current File mode:
- Testing a specific dialogue scene you're working on
- Debugging a single script's logic or branching paths
- Iterating on individual conversations or sequences
- Verifying that local variables work correctly within a script
How it works:
- The Play Window loads the currently active script file
- Execution starts at that script's Start node
- The script runs until it reaches an End node
- If the script uses Run Script nodes, it can call other scripts normally
Active File Requirement
The Play button is disabled in Current File mode if no script file is open or if an image file is active. Make sure you have a .sfe script file open in the editor.
Startup Script Mode
Tests your entire project from the designated startup script. This is the script that will run when players launch your exported game.
When to use Startup Script mode:
- Testing your complete story from beginning to end
- Verifying that the full game flow works correctly
- Testing how global variables persist across multiple scripts
- Simulating the player experience of your exported game
How it works:
- The Play Window loads the project's startup script (configured in project settings)
- This is the same entry point that exported HTML games use
- Global variables work exactly as they will in the final game
- All script transitions via Run Script nodes function normally
Configuring the Startup Script
The startup script is configured using the dropdown in the Play button's settings menu:
- Click the menu icon (⋮): Click the small button to the right of the Play button
- Locate Startup Script: Find the "Startup Script" dropdown in the menu
- Select your script: Choose which script should be your game's entry point
- Search filter: Use the search box to quickly find scripts in large projects
Startup Script Purpose
The startup script serves two purposes: it's the script that runs when you select "Startup Script" mode in the editor, and it's the first script that runs when players launch your exported HTML game.
Switching Between Modes
To change which mode the Play button uses:
- Click the menu icon (⋮) next to the Play button
- Under "Editor Play Script", select either:
- Current File: Test the script you're editing
- Startup Script: Test the full project
- Your selection is remembered for future editing sessions
Tooltips explain what each mode does when you hover over the radio buttons.
Play Window
When you press Play, a new window opens displaying your interactive story. This window contains the game runtime that executes your node graph.
Window Features
- Dialogue Display: Shows the current dialogue text at the top
- Option Buttons: Displays available dialogue options as clickable buttons
- Background Images: Renders background images set in Dialogue nodes
- Debug Toggle: Bug icon button in top-right corner opens the Runtime Debugger
- Window Title: Shows your project name
Interacting with Your Story
- Read dialogue: The text display area shows the current dialogue
- Make selections: Click any available option button to progress
- Conditional options: Options may appear or disappear based on variable values
- Background changes: Backgrounds transition when dialogue nodes specify different images
Runtime Execution
Behind the scenes, the Play Window executes your node graph:
- Starts at the Start node: Execution begins at the node with ID "0"
- Follows connections: The runtime traces edges between nodes based on your options
- Evaluates logic: Branch nodes, boolean operations, and integer comparisons execute automatically
- Updates variables: Set Boolean and Set Integer nodes modify variable values
- Calls scripts: Run Script nodes load and execute other .sfe files
- Tracks state: Local and global variables persist throughout the session
Call Stack Support
When a script uses a Run Script node to call another script, the runtime maintains a call stack. This allows called scripts to return to the calling script when they hit an End node, just like function calls in programming.
Window Behavior
- Parent relationship: The Play Window is attached to the editor window
- Position memory: Window size and position are remembered between sessions
- Resizable: You can resize the window to any size (minimum 320x320 pixels)
- No menu bar: Menu bar is hidden for a cleaner testing experience
Stopping Playback
There are multiple ways to stop playback and close the Play Window:
Method 1: Escape Key
Press the Escape key while the Play Window is focused. This is the fastest way to exit during testing.
Method 2: Stop Button
When a story is playing, the green Play button (▶) in the editor toolbar changes to a red Stop button (■). Click it to close the Play Window.
Method 3: Close Window
Click the X button in the Play Window's title bar to close it normally.
Method 4: End Node
If your story reaches an End node and there are no scripts in the call stack (meaning the top-level script ended), the Play Window automatically closes.
Nested Script Behavior
If you're inside a script that was called by another script (via a Run Script node), reaching an End node will return to the calling script instead of closing the window. Use the Runtime Debugger's call stack display to see the nesting level.
Automatic Saving
Before the Play Window opens, StoryFlow automatically saves all files with unsaved changes. This ensures you're always testing the latest version of your work.
What Gets Saved
- All modified scripts: Any .sfe files with unsaved changes are written to disk
- Node positions: Visual layout changes in the node editor
- Node data: Dialogue text, variable settings, connections, etc.
- Project settings: Startup script configuration and other project-level settings
Save Process
- You click Play: The Play button is pressed
- Check for changes: Editor detects files with unsaved changes (marked with yellow asterisks)
- Auto-save all: All changed files are saved automatically
- Short delay: 150ms pause to ensure file system has flushed all writes
- Window opens: Play Window opens and loads the saved script data
Smooth Saving
The auto-save process is fast and seamless. You won't notice any delay unless you have many large scripts with unsaved changes. Saving happens in the background, so you can focus on testing.
Why Automatic Saving?
The Play Window runs your scripts by loading them from the file system. Without auto-save, you might test outdated versions of your scripts, leading to confusing debugging sessions where changes don't appear to work.
Automatic saving guarantees that what you see in the Play Window matches what you've built in the editor.
Tips & Best Practices
Use Current File Mode for Rapid Iteration
When working on a specific scene or dialogue tree, set the Editor Play Script to "Current File". This lets you test just that script without playing through earlier parts of your story.
Workflow example:
- Open the script you want to work on (e.g., "ShopConversation.sfe")
- Set Play mode to "Current File"
- Make changes to dialogue or logic
- Click the Play button to test immediately
- Press Escape to close and make more changes
- Repeat until the scene is perfect
Test the Full Game with Startup Script Mode
Before publishing or sharing your story, switch to "Startup Script" mode and play through the entire experience. This helps you catch issues that only appear when scripts interact with each other.
Things to verify:
- Global variables persist correctly across script transitions
- The story flows logically from beginning to end
- Run Script nodes load the correct scripts
- Background images display at the right moments
- Conditional branches work as expected based on player options
Keep the Runtime Debugger Open
While testing, open the Runtime Debugger (bug icon in Play Window) to monitor variable values in real-time. This helps you verify that your logic is working correctly.
Test Edge Cases
Don't just test the "happy path" through your story. Try:
- Making unusual dialogue options to test all branches
- Testing with variables at minimum and maximum values
- Verifying that conditional options appear and disappear correctly
- Testing deeply nested Run Script calls
- Checking error messages and dead ends
Use Descriptive Startup Scripts
Name your startup script something clear like "MainMenu.sfe" or "GameStart.sfe" rather than "Script1.sfe". This makes it obvious to you (and collaborators) which script is the entry point.
Create Test Scripts
Consider creating dedicated test scripts that set up specific scenarios:
- VariableTests.sfe: A script that sets up variables and tests conditional logic
- QuickStart.sfe: A script that skips to a specific chapter for testing
- AllPaths.sfe: A script with options that let you jump to different story branches
You can temporarily set these as your startup script to test specific scenarios without playing through the entire game.
Pro Tip: Test Early and Often
Don't wait until your entire story is complete to start testing. Press Play frequently as you build to catch issues early. It's much easier to fix a bug in a 10-node scene than in a 1000-node epic after everything is connected.
Verify Background Image Paths
If background images aren't appearing in the Play Window, check that:
- Image files are in your project's Content folder
- Image paths in Dialogue nodes are correct
- Image files are in a supported format (PNG or JPEG)
- File names don't contain unusual characters
Multiple Play Windows
Only one Play Window can be open at a time. If you press Play while a Play Window is already open, the existing window closes and a new one opens with fresh state.
Closing the Editor
If you close the main editor window while the Play Window is open, the Play Window will also close automatically. They're linked together for convenience.
Related Topics
→ Runtime Debugger→ Quick Start→ HTML Export→ Best Practices